
The PSD School
Section 12 by Lars Stenberg, ESDE AB
Mechanical construction of a triangulation probe, selection of materials
In chapter 11 we studied a number of different lens types that may be used as main lens when a triangulation probe is to be designed. In chapter 12 we shall study another lens type and then move on to studying the mechanical construction of a triangulation probe.
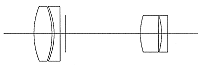
We concluded chapter 11 by noting that if we wish to keep the requirement that the entry pupil be 15 mm we must introduce a lens system consisting of at least 4 lenses. In this case too, there are several different types to choose from but I have chosen to investigate yet another classic lens design, a so-called Petzval lens. This lens was designed by Joseph Max Petzval in 1840 and frequently comprises two separated achromatic lenses that are corrected so that the image field is flat. Since the lenses are frequently not cemented this lens is very suitable for use in projectors since heat radiation from the projector lamp may otherwise damage the cement leading to destruction of the bond.
The result for a Petzval lens appears from the illustration as well as from table 8.
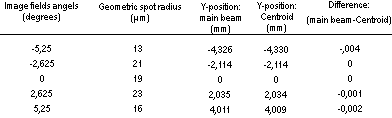
Table 8. Petzval lens comprising LAKN12, SF8, LAKN12 and SF4 lenses.
Please observe that we now have spot diameters of the order of 46 mm while the distortion amounts to a maximum of 4 mm or twice as much as for the Cooke triplet according to table 7. On the other hand the entry pupil is 15 mm which corresponds to 2.25 times as large a surface area as for the Cooke triplet.
The performance that has been indicated for the above lens should not be understood in terms of fully-corrected solutions but rather the intention is that the reader acquire a feeling for how great the faults are for the various lens systems. The different suggestions may surely be optimised further. For example, it appears from the size of the spot radii in table 8 that the Petzval lens is impaired by zonal errors since the spot radii for the image field angles +/- 2.625° are greater than for the angles 0° and +/- 5.25°. These errors are fairly easy to reduce. Moreover, it should be possible to reduce the distortion further and increase the entry pupil to 18 to 19 mm for the Petzval lens.
Through using a lens system with even more lenses we can further improve the performance that has been outlined in this section of the PSD school. At the same time, however, we must not forget that costs are also increasing all the time. If for example I were to design a triangulation probe with a very large measuring interval I would choose a so-called double symmetrical Gaussian lens that, in our case, would comprise 6 lenses. In order for the triangulation probe to actually obtain an unusually large measuring interval it would probably be necessary to choose a significantly longer PSD detector that at the same time is significantly more expensive. It is necessary, on a continuous basis, to compare performance with price so that the complete triangulation probe has an end-price that is acceptable to the customer.
Mechanical design of a triangulation probe
My customers frequently ask more questions on the precision of the optical components than on the design of the mechanical parts that determine the optical components. Nevertheless, even if the optical design is very well optimised the finished triangulation probe has a performance that varies between mediocre and disastrous if the mechanical construction is not carried out with due care. We shall therefore study a number of different mechanical design aspects.
Selection of materials
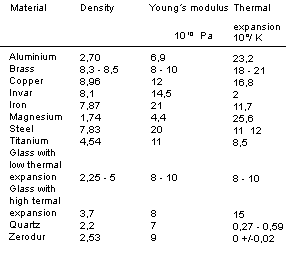
There are many different metallic materials as well as different glass and plastic varieties. Bearing in mind the limited space, I must - for the time being - limit myself to the metallic materials as well as a few different glass varieties. Table 9 gives examples of a few such materials.
Let me first point out that I have only included a small selection of different materials in order to be able to carry out discussions in principle on the material selection. On one occasion, when I visited one of the world’s larger manufacturers of optical instruments, representatives of the company said that around 2,200 different metallic materials and alloys were held in stock. To start with, we should go through the different materials and study what they may be used for and - particularly important - which other materials they may be combined with.
Aluminium alloyed with other metals such as copper, magnesium, manganese, lead and bismuth is frequently used in optical instruments. Pure aluminium is very soft and therefore difficult to machine. Examples of such materials are theodolites, binoculars, cameras, video cameras, triangulation probes etc. The most common surface treatment is black anodization. This results in a relatively durable surface but, on frequent occasions, much too high a reflection is produced in order for it to function inside e.g. a lens holder. In this case it is necessary to paint inside the lens holder with a reflex-reducing black paint. In order for anoxidation to produce an even and black surface it is necessary not to choose too hard an aluminium alloy since in that case the surface becomes grey and patchy. It is difficult for parts manufactured in Duralumin e.g. to produce an uniformly even surface. One must be aware that an anodoxation layer, frequently amounting to 5 - 25 µm, has insulating properties. On the one hand, one does not dare to use it as a pure insulating material but, on the other, one must allow for the possibility of being forced to install earthing straps between every anodized aluminium part in an instrument in order to avoid interfering earth currents. It is possible to produce a complete lens holder with distance spacers and threaded lock rings in aluminium but in that case the parts must be anodoxised and provided with a creep-resistant grease before the lens is installed. Otherwise there is a risk that aluminium parts with close tolerances seize when they are installed. To construct moveable aluminium parts that wear against one another must be regarded as bordering on the criminal. If there is an intention to design an optical instrument to function at different temperatures then it is essential to be careful when intending to utilise aluminium, taking into account aluminium’s coefficient of linear (heat) expansion but more on this later.
If one wishes to combine aluminium with other materials in order to execute a mechanical function it is rather a question of looking out for the materials that should not be combined with aluminium than those materials that should be. On account of the large electro-potential difference of aluminium and brass it is not recommended to mix aluminium and brass. In a design that I came into contact with it was possible to unscrew the brass screws with the fingers alone from an alloyed aluminium stand where they were originally screwed tight. In this case the stand had been over-rinsed with sea water. It is a good idea to use stainless steel screws in order to screw together aluminium parts but it will not be a good bearing if a steel shaft is to rotate in a aluminium socket e.g.
Brass is easy to finish and it is possible to achieve surfaces with very high lustre. A very good polishing agent for brass is e.g. crushed hazel-nut shells. On the other hand it is harder to provide brass with a cheap black surface coating. Inside ocular and microscopic lens black oxidation or browning is frequently used which gives a dark-brown colour. In order to eliminate interfering light reflections, it is essential to paint with a reflex-cutting black paint of type Nextel produced by 3M. In order to obtain a hard-wearing and beautiful surface a coat of nickel and then one of chrome is frequently applied. Brass may be combined very well with iron and steel. In order to achieve high-quality focusing mechanisms it is e.g. highly advisable to screw a threaded steel lens holder in a brass socket. This material combination is used in camera lenses of the highest quality. If one has a rotating steel shaft it is possible to achieve a very good mounting in bearings by choosing a brass sleeve that comprises sintered small brass balls. Then small cavities are created between the brass balls that may be filled with grease. This is sometimes described as a bearing greased for life. If there is a requirement for large radial loads then it is necessary to use ball bearings instead.
In the next section of the PSDschool we shall continue our study of different materials.
|
« home