
The PSD School
Section 2 by Lars Stenberg, ESDE AB
Design parameters for a triangulation probe
In section 1 of the SiTek PSD School, we used the triangulation probe as an example of what a PSD detector can be used for. Since this is a very common application of PSD detectors, we will cover various design parameters which you will have to consider if you want to design one. We will do a detailed study, both to give tips and calculation material for the design of a triangulation probe, and also to give better understanding of the parameters which are particularly important for making the entire probe work satisfactorily.
Introduction
If you want to design a triangulation probe, you must consider the following parameters (see figure 1):
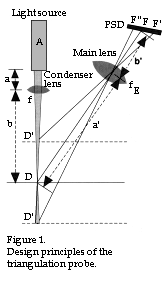 geometry, light source (A), any filters, main lens (E), condenser optics, detector (F), electronics and mechanical components.
Since this is a question of non-contact distant measurement, the distance from the light source (A) to the measured object (D) can be varied within quite wide limits. As we will notice, the measurement accuracy or the measurement range D'D" are reduced as well, if distance AD is chosen to be unnecessarily large. In practice, one attempts to choose the distance AD to be no longer than necessary.
The Problem
You have to find a compromise between the various parameters, so that the requirements imposed by the application in question are met as far as possible. In figure 2 below, there is an angle ADF (referred to as a later in the article) of 30°, 45° and 60° in alternatives 2.1, 2.2 and 2.3 respectively.
The aperture of the main lens (E) is the same for each of the three alternatives, as is the angle of view (see fact square) of the main lens (E).
As shown in figure 2, the greatest measurement range (D'D") is obtained in alt. 2.1 since the angle ADF is smallest. This implies that distance AF is shortest in alt. 2.1. It is of course the distance AF, together with the size of the light source A and the detector F which determines the smallest linear extent of the triangulation probe along the plane of the paper. On the other side, it is obvious that alt. 2.1 makes greater demands on the resolution of the detector (F) than alt. 2.3.
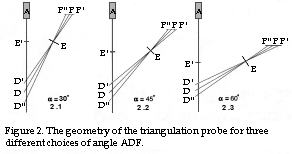
In addition, it is also obvious that the free air gap E'D' is reduced as the angle ADF increases. The choice of value of angle ADF thus affects: measurement distance AD, measurement range D'D", the free air gap E'D', resolution and the dimensions of the triangulation probe itself.
Some of the above mentioned parameters can be affected, as we will see below, by choosing a lens with another aperture and by choosing a detector with another effective measurement length. In practice however, it has been found that the angle ADF is mostly chosen to be in the range of 35° to 45°.
The most important thing about this explanation is that you should understand the factors involved. To find a suitable compromise, you need the expressions which we will develop below and may possibly have to spend one working day to find a suitable geometry, considering the size of the detector and the availability of suitable objectives E.
Procedures
The most practical procedure for designing and calculating the various parameters in a triangulation probe is to begin by selecting suitable start values for the various parameters: (see figure 3)
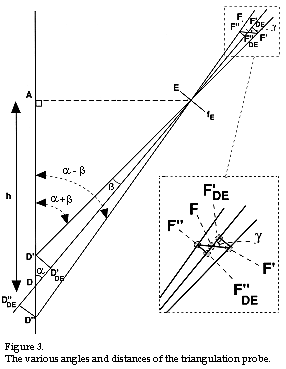 : the free distance h between the object and the probe, the angles a and b plus the aperture fE of the main lens. After this, you calculate the other parameters by means of the formulae which we will shortly derive: detector length F'F", the total measurement range D'D" and the angle g, which specifies the angle at which the detector should be aligned relative to the main lens. If you are satisfied with the result obtained, all is well, but it is more probable that you are going to want to adjust one of the parameters. By re-doing the calculations one or several times with the following start values, you can work your way to a suitable compromise.
Calculation formulae
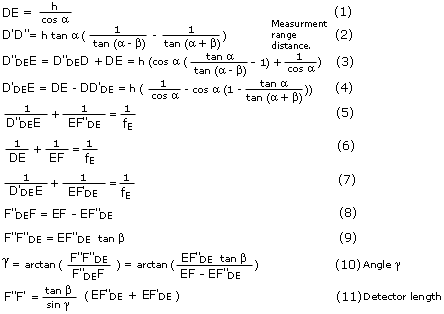
Using figure 3, the usual trigonometric functions for triangle solution and the lens formula for thin lenses (see fact square).
1 + 1 = 1
a b f
Where a is the distance from the object to the lens, b is the distance from the lens to the image and f is the aperture of the lens, the necessary expressions can be derived.
It all ends up with 11 equations which have to be calculated. The numerical calculations should preferably be done with a programmable calculator or computer, especially since a number of iterations are normally required before one is satisfied with the geometry of the triangulation probe.
We obtain the following expressions. (If you want a complete proof, please contact SiTek).
We will do a numerical calculation in the next issue, discuss the result and possible changes, and the choice of various components
|
Fact box: There are various parameters which are used together to describe how well a lens will work in a specific application. Aperture and focal length are of course among these parameters. Another very important parameter is the so-called field of view angle, i.e. the angle inside which the lens can form a sharp image on the focal plane of the lens. Some companies specify half the field of view angle, others specify the entire included angle. So make a habit of always asking a supplier what is meant, unless it is unambiguously described in the lens specification and possible tender. A thin lens is termed as one which has a thickness of 0. They do of course not exist in reality, but for principle calculations such as those we are doing here, this simple formula is very usable. Later on, I will take up the question of what happens when a lens no longer can be regarded as being thin. |
|
« home