
The PSD School
Section 6 by Lars Stenberg, ESDE AB
How to acquire a suitable collimator lens
In previous sections of SiTek's PSD school we examined the formulae that relate to the geometry for a triangulation probe as well as how these are applied in design. We have also calculated the focal length of the main lens and condensor optics. In addition the choice of the light source and the means of generating a so-called quasi-collimated light has been dealt with. In section 5 we discussed the choice of suitable optical components for a triangulation probe and we shall continue with this in sections 6 and 7.
How is it possible to acquire a suitable collimator lens with a focal length of 17,1 mm?
In the first place it is essential to determine what type of lens is required. Is a simple lens sufficient or must there be a lens system? In our case we want the aperture on the laser diode to be re-produced on our measure-ment surface which means that we therefore need a lens system with a focal length of 17,1 mm. (A lens system may actually consist of just one or a number of simple lenses, even mirrors).
Let us do this with a simple biconvex lens and see how sharp a picture we can acquire. We use one of the most common optical glass types with the designation BK7 (manufactured by Schott in Mainz, Germany among others). The refraction index for BK7 at a wavelength 656,3 nm is 1,51432. With the aid of an optical calculation program, in this case ZEMAX from Focus Software, Inc. USA, I have calculated that if the biconvex lens radius is 17,4183 mm and the thickness of the lens d= 1 mm the focal length is 17,1 mm where the refraction index is1,51432. See figure 1.
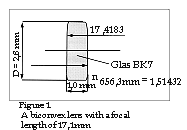
Moreover, the program has calculated that if the laser diode is at the distance of 19,599 mm in front of the lens we achieve an image of 120 mm behind the lens. There is a further matter that we must take into consideration before we can start up the computer and allow it to estimate the light spot's diameter, which is how large will be the aperture that we shall use, ie. the diameter of that part of the lens that light can pass through. If we wish that the en-tire aperture shall be struck by light from the laser diode and that the last-named emits a light cone with an elliptical format cross-section the minimum angle of which is 3,5░, then half the aperture should be 19,599 x tan 3,5 mm= 1,2 mm. (on the drawing above I have chosen a lens diameter of 2,8 mm since a small edge around the lens is hidden behind the grip).
The modern optical calculation program offers a number of different opportunities when it comes to finding out whether a lens is sufficiently good for any specific task. I have chosen to emit several hundred light beames from a point on the optical axis which lies 19,599 mm in front of the lens which strikes the lens surface's free opening with a diameter of 2,4 mm, evenly distributed across the opening. Subsequently, the computer calculates exactly where each light beam hits a surface situated at a distance of 120 mm behind the lens and which is at right angles to the optical axis. Figure 2, called a spot diagram, shows where all the light beams hit the surface with the aid of a +- sign. The program also gives the radius of the light spot and it is, of course, this which interests us more in this case.
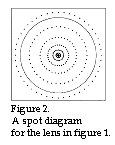
According to the computer, the greatest radius of the light spot is 46,42 Ám. The computer has also drawn a complete circle that represents the so-called Airy-disk whose radius is 40,97 Ám. The Airy-disk represents the diffraction that is obtained, on account of the fact that the wave-length of light is not zero and it also depends on the aperture's maximum diameter used, which in our case is 2,4 mm. In No. 1-96 of Non-Contact I reported how the radius of the Airy-disk is calculted.
Our lens is thus not diffraction-limited since different light beams lie outside the Airy-disk. This means that we can achieve a light spot of smaller diameter if we can improve the lens. Before we investigate if this is possible, we should see how good the lens calculated above really is. Since the distance between the laser diode and the lens is about 20 mm and the distance between the lens and the light spot is 120mm, the Gaussian magnification is about 6 times. This means that if the channel on the laser diode is 5 Ám long the image of the channel is 6 x 5 Ám= 30 Ám. On account of the diffraction there is an addition of 2 x 40,97 Ám which means that our light spot will acquire a maximum length of 111,94 Ám. Observe that the size of the diffraction only depends on the light wavelength used as well as the free lens surface diameter.If we accept such a spot size, it is only a question of searching in different optical catalogues. For example, I found the lenses specified below in the following catalogues:
| Edmund Scientific Company: |
|
|
| Melles Griot: |
|
|
| Spindler & Hoyer: |
|
|
Since the lens from the Edmund Scientific Company is nearest the lens we have calculated, the next step is to investigate what the light spot looks like with the aid of the optical program.
The result appears from figure 3 below.
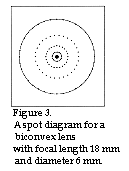 As appears from figure 3 the
spot radius is 40,6 Ám while the diffraction remains at 40,97 Ám.
As appears from figure 3 the
spot radius is 40,6 Ám while the diffraction remains at 40,97 Ám.Does this now mean that Edmund Scientific has designed a better lens than we have done? By no means, since the distance from the laser diode to the lens must now be 20,53 mm instead of 19,599 mm in order to end up 120 mm from the lens on account of the focal length being 18 mm. It is this - as it may seem - slight difference which explains why the light spot has becom somewhat smaller. Can we then use the lens from Edmund Scientific? In order to answer this question there are two things we must answer.
In the first place; can we accept the spot┤s size? Remember that it is you, in your capacity as a designer, who determines if such a light spot is sufficiently good or if we should continue to attempt to design a lens which gives an even smaller light spot.
In the second place; is there room for the lens from Edmund Scientific in our equipment? The lens we started to design requires additional length 19,599 + 1 mm = 20,599 mm and the diameter 2,8 mm whereas the lens form Edmund Scientific requires 20,53 + 2,2 mm = 22,73 mm and the diameter 6 mm. It is important that the person responsible for the mechanics has not already been allowed to draw so much for the answer to be negative. This is an example of how important it is that the optical and mechanical designers really do work side-by-side when designing an optronic product. At times, however, the hard reality can enforce solutions which really are minimal ones so far as additional margin is concerned.
An even better solution
The optical calculation program is provided with the aim of investigating if a biconvex lens relly has the optimum form. The result appears from figure 4 on the right.
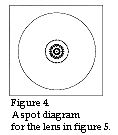
As figure 4 shows the radius of the light spot is 12,41 Ám if the radius which is nearest the laser diode is 35,62 mm and the other radius is -11,57 mm. (The minus sign means that the centre of curvature lies to the left of the lens surface itself and the plus sign that it lies to the right). The lens then acquires the appearance in figure 5.
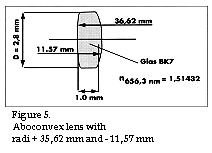 We
must not forget that the radius of the Airy-disk is still 41 Ám which also appears from
figure 4. The reader may now be wondering what the purpose of the above-mentioned
calculation is, since, after all, it is the size of the diffraction that determines the
final diameter of the light spot.
We
must not forget that the radius of the Airy-disk is still 41 Ám which also appears from
figure 4. The reader may now be wondering what the purpose of the above-mentioned
calculation is, since, after all, it is the size of the diffraction that determines the
final diameter of the light spot.Now, however, it so happens that the diffraction size depends on the diameter of the lens opening (See Non-Contact 1/96). We therefore almost double the lens opening from 2,4 to 4,44 mm and get the computer to calculate what is now happening. The computer has now calculated r1 at 36,28 mm and r2 at -11,65 mm while the Airy-disk radius has decreased to 20,36 Ám as expected, but the geometric spot radius is 98,69 Ám on account of the so-called opening error or spherical aberration as the error is also called.
This error depends on the fact that spherical lens surfaces are not at their very best when as sharp a focus as possible is called for. We therefore get the computer to calculate when the Airy-disk radius is as large as the geometric light spot radius, ie. we get the computer to work out the optimal opening. The result appears from illustration 6 and it is
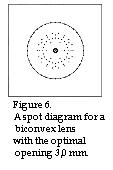 demonstrated that when the opening is 3,0 mm the Airy-disk radius is equivalent
to the geometric light spot radius which is then 30,7 Ám. This occurs when r1 = 35,80 mm
and r2 = -11,59 mm. The illustration of the light spot's greatest extent, as a result of
Gaussian magnification as well as diffraction, will be 30 + 2 x 30,7 Ám = 91,4 Ám. The
entire lens opening will, nevertheless, not be filled by light from the laser diode since
this, after all, only emits light below an angle of 7░ at the minimum. This means that
the diffraction will be somewhat larger than as we calculated above.
demonstrated that when the opening is 3,0 mm the Airy-disk radius is equivalent
to the geometric light spot radius which is then 30,7 Ám. This occurs when r1 = 35,80 mm
and r2 = -11,59 mm. The illustration of the light spot's greatest extent, as a result of
Gaussian magnification as well as diffraction, will be 30 + 2 x 30,7 Ám = 91,4 Ám. The
entire lens opening will, nevertheless, not be filled by light from the laser diode since
this, after all, only emits light below an angle of 7░ at the minimum. This means that
the diffraction will be somewhat larger than as we calculated above.Before we leave our design that comprises a single lens, there is one other thing we must check and we shall do this in the next section of the PSD school. Have we reached the end of the road or is there something else we can do so as to achieve an even smaller light spot? In the next section of the PSD school we shall look at how we can achieve an even smaller light spot through using a lens system that consists of 2 lenses.
|
ź home